Tracy for Project and Task Management: A Step-By-Step Setup Guide
“I wasn’t looped in” or the classic “Oops, slipped my mind—my bad” are pretty common responses when checking on task completion. If you set a task while talking on the phone or write it in a messenger, you yourself have to keep all this in your head—constantly reminding yourself and bugging colleagues with questions like “So, what’s the deal?”, “When’s that due?”.
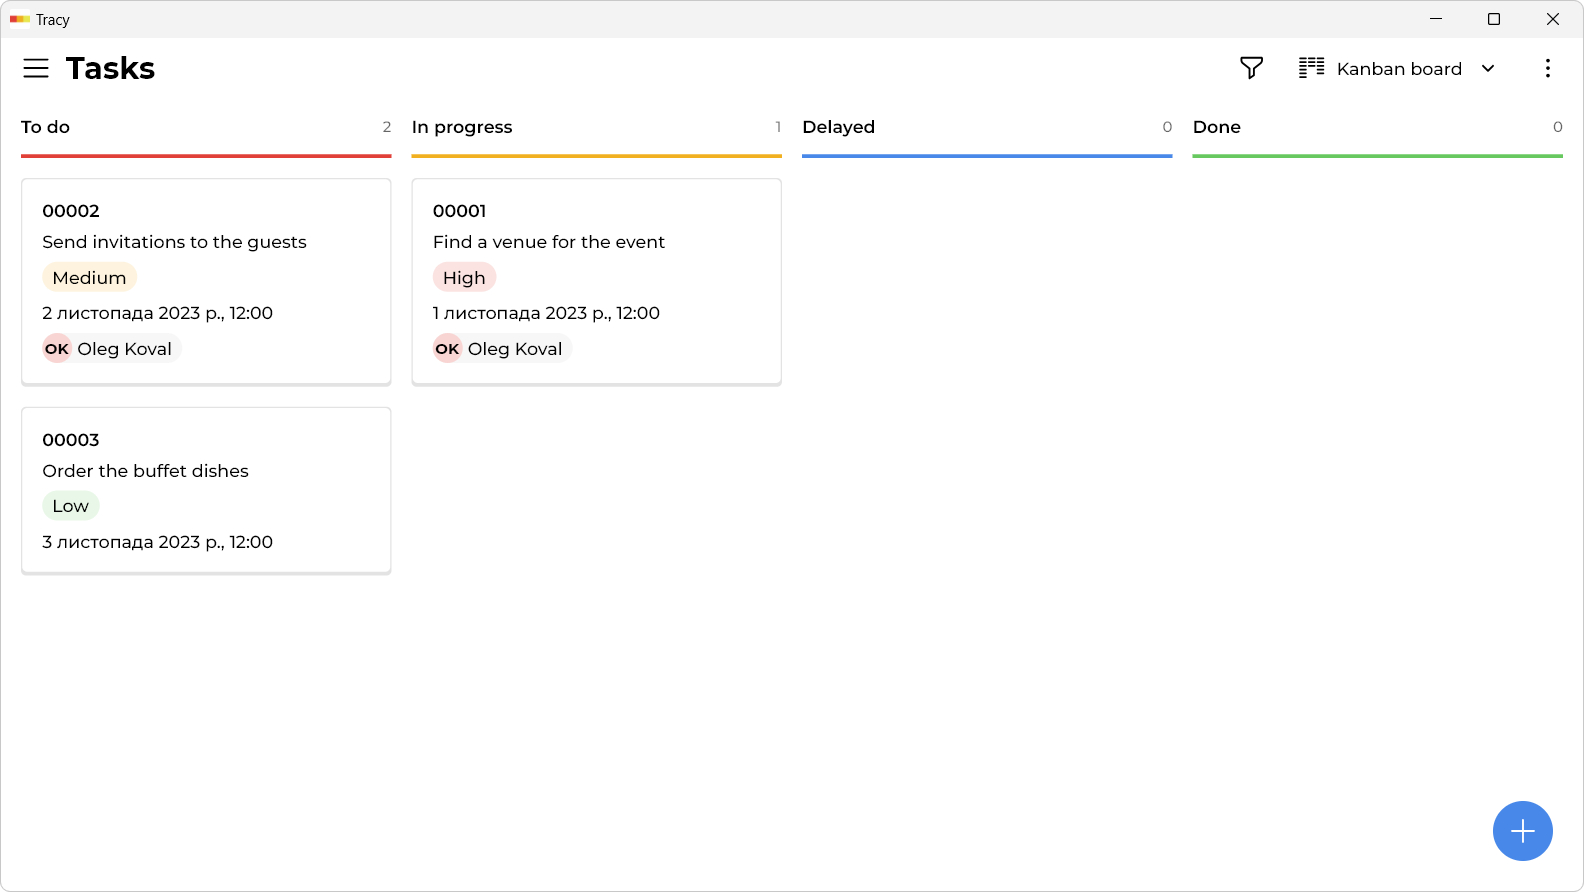
Tracy will provide you with a very simple tool for organizing work within your team. You create a task, specify all the information necessary for its execution, a deadline (when everything should be ready), and also choose who is responsible for the execution of the task. This person (or group of people) receives notifications, sees what and when to do. You also receive a notification when the task status changes. You can also see the overall picture at any moment—who’s tackling what and where tasks stand in the grand scheme of things:
At the same time, each responsible person has their own clear work plan:
![]()
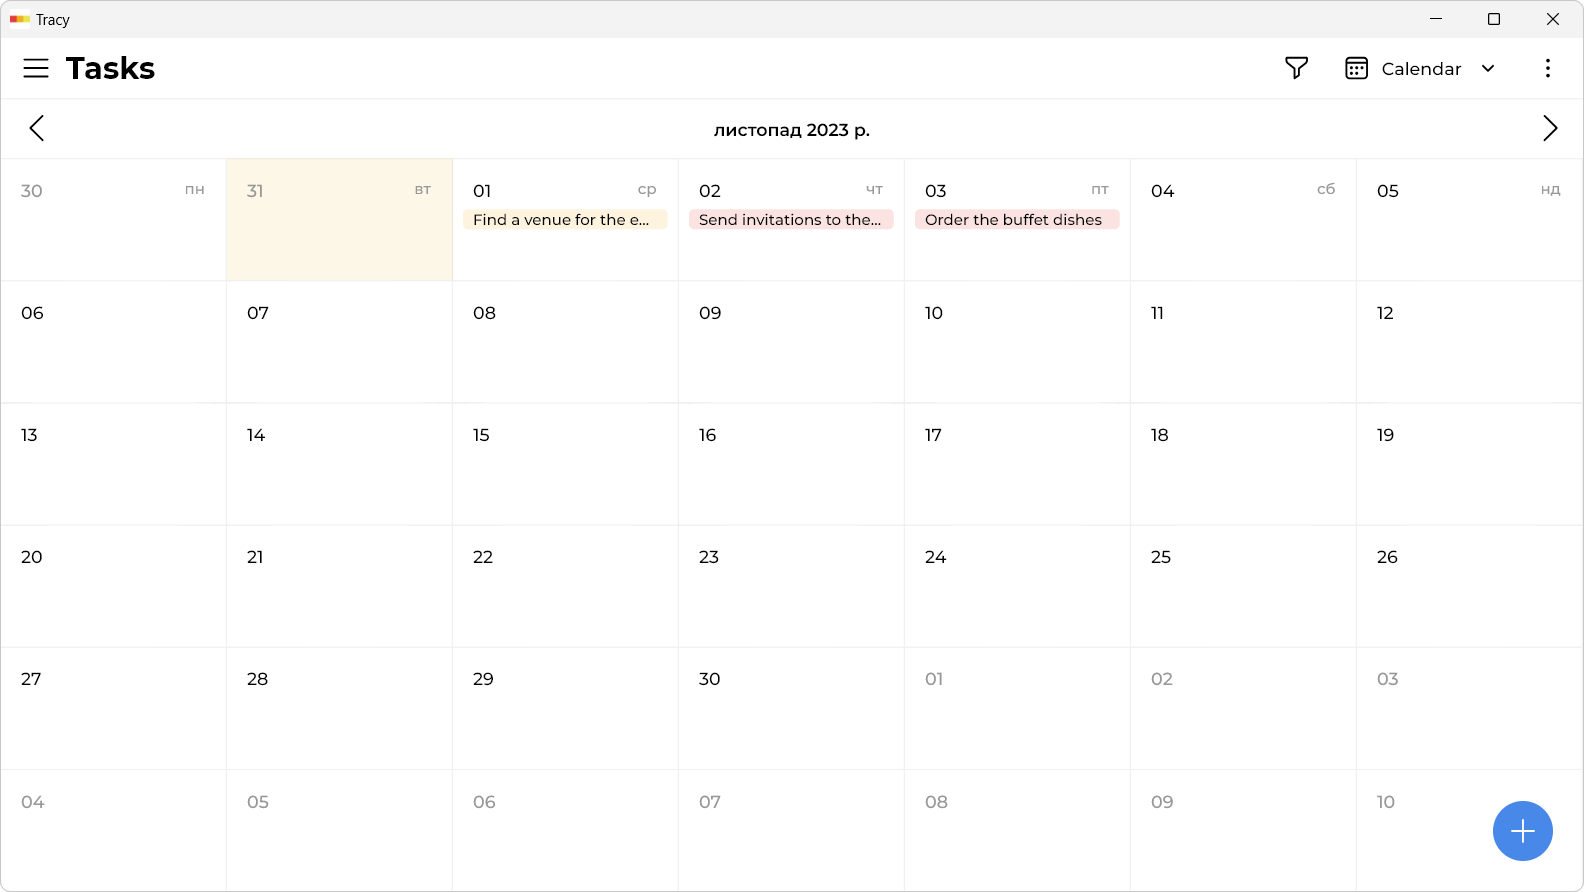
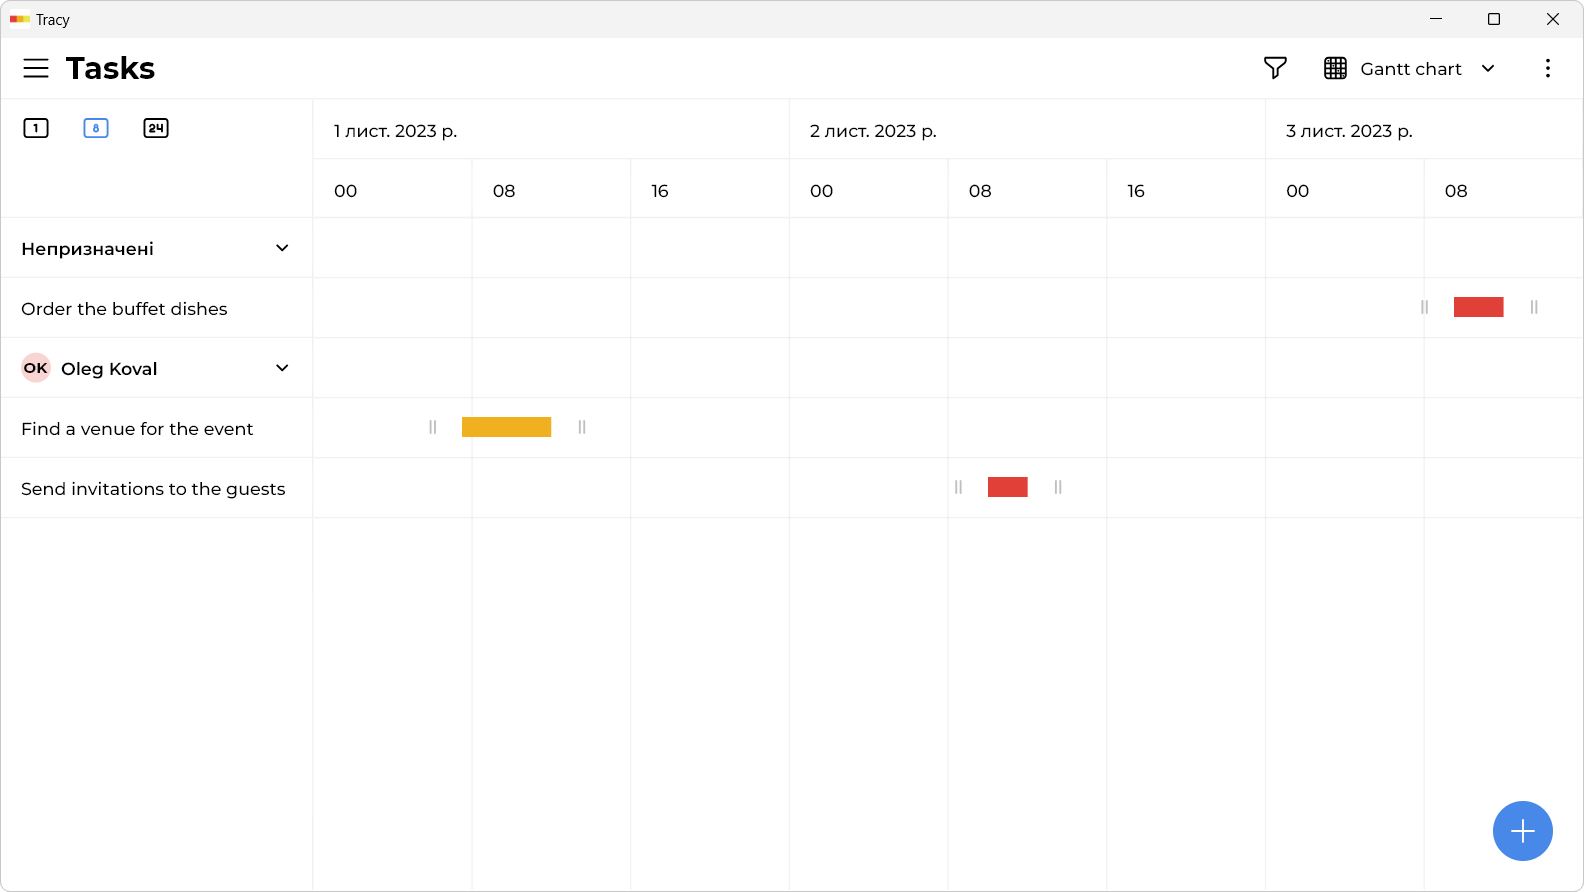
You can work with different types of tasks (according to the different processes in your team), conveniently switching between them. For each type of task, you can define your own set of fields for storing the necessary information, so that you don’t write everything you need to do in one big piece of text but work with structured information. In addition to the usual Kanban board, it is convenient to use a calendar or a Gantt chart to plan work, optimize logistics using a map, improve efficiency by analyzing graphs, etc.
1. Application Installation
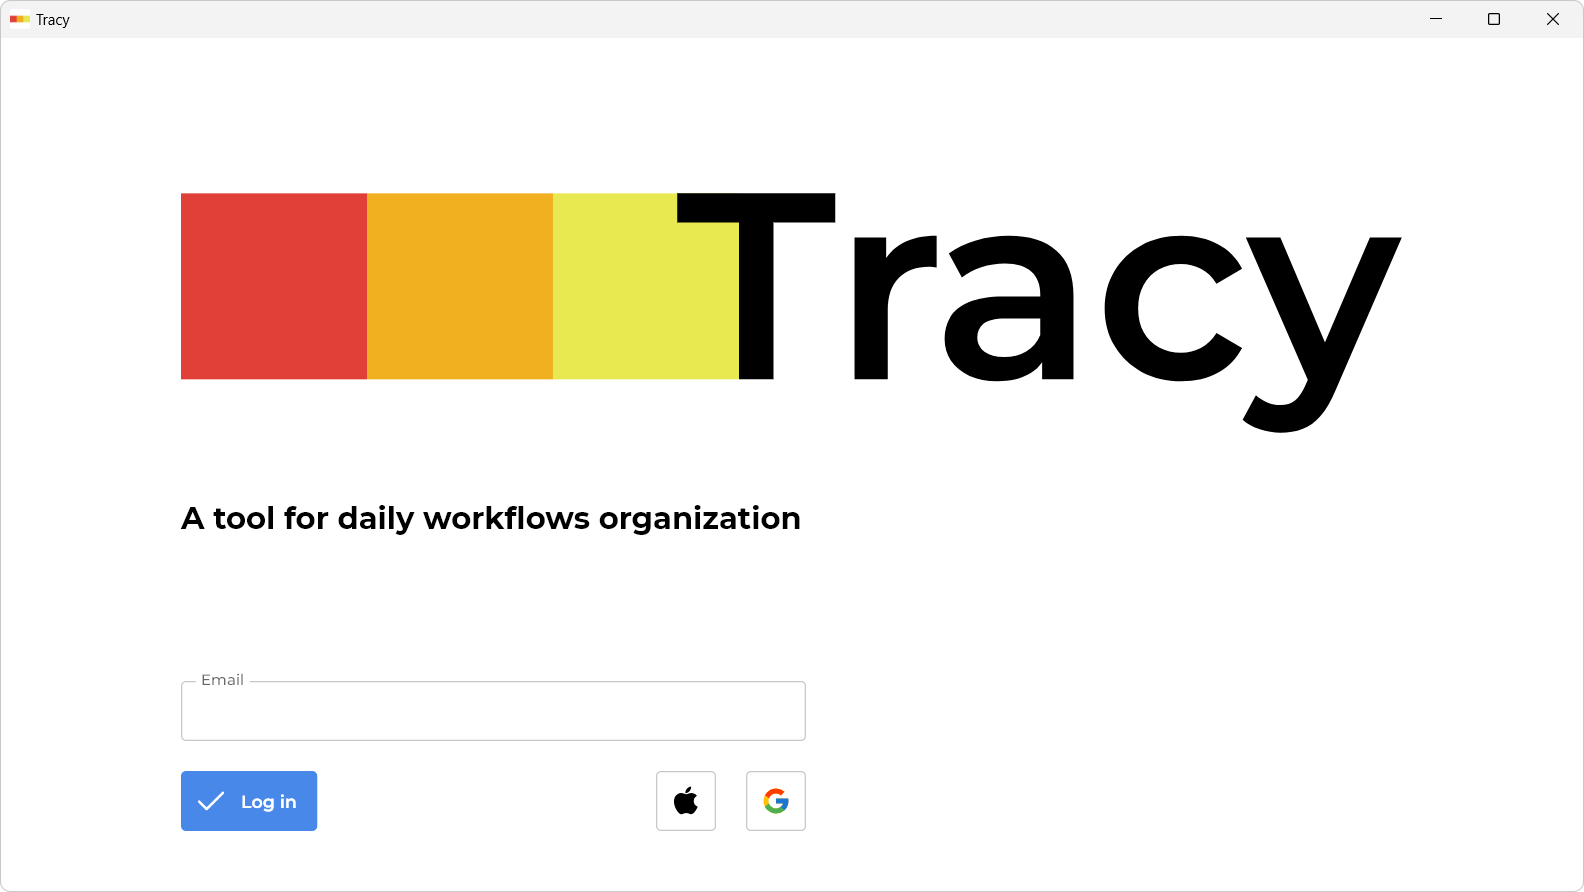
Tracy is available on all popular platforms—Android, iOS, macOS, Windows, and the web (that is, it also works in the browser, no installation required). To select and download, please go to the website: https://tra.cy.
2. Registration
The first time you launch the app, you’ll be asked to sign in with either your email and one-time password, or your Apple or Google account:
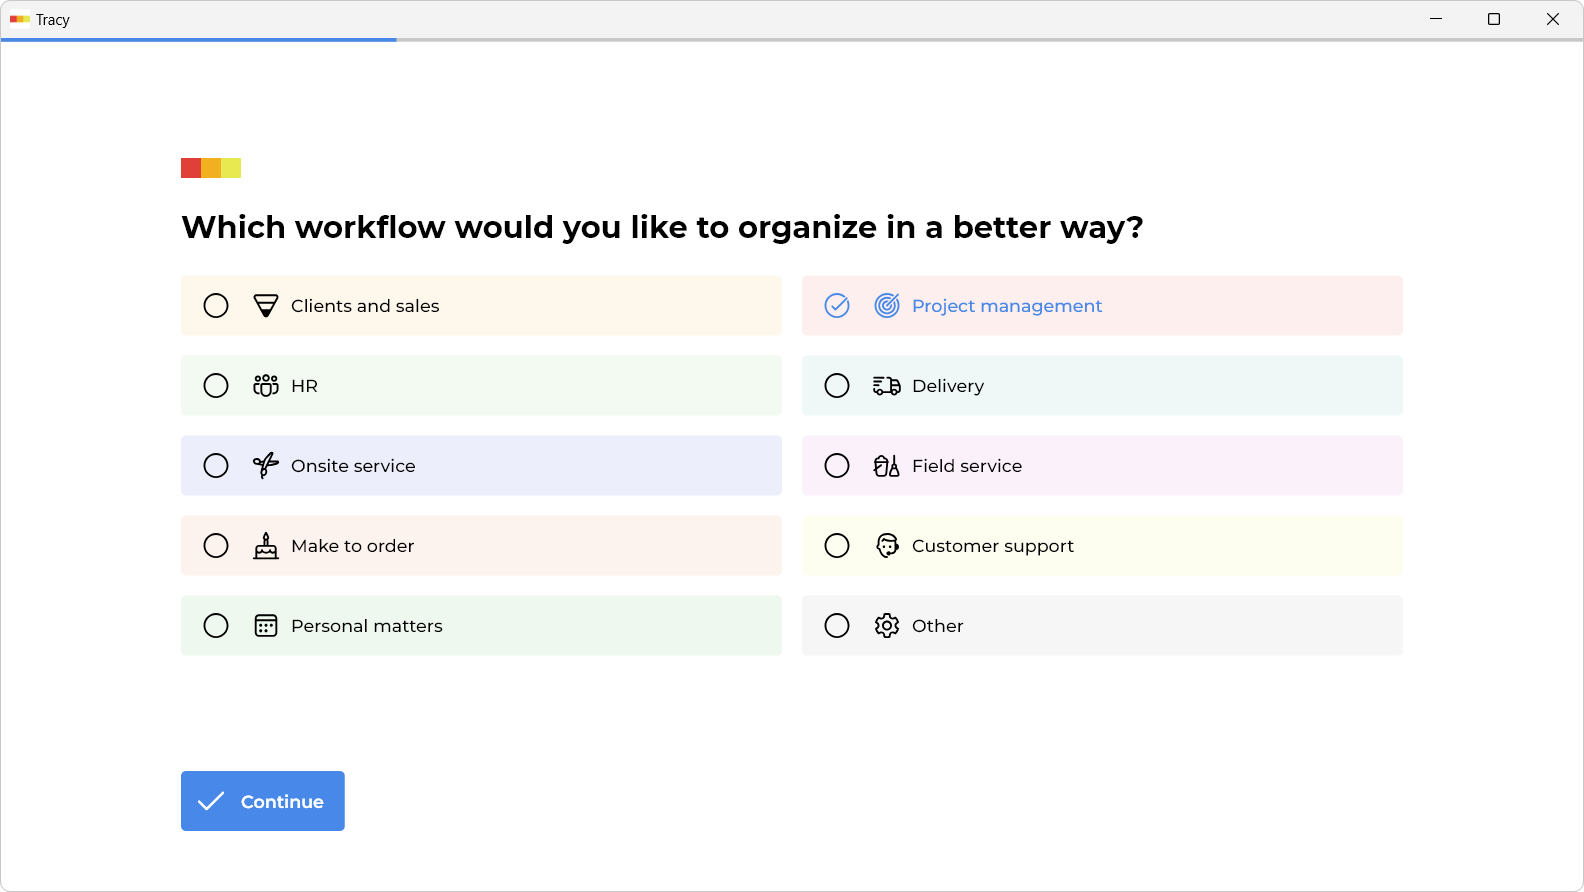
Next up, you’ll find a selection of basic templates to give you a head start and save some of your time. Functionally, they’re all on the same page—the only variance lies in the initial content and settings. For our purposes, let’s roll with “Project management”:
Next, enter the name of your organization and your name and create a workspace. You can also add your colleagues later.
3. Task Details
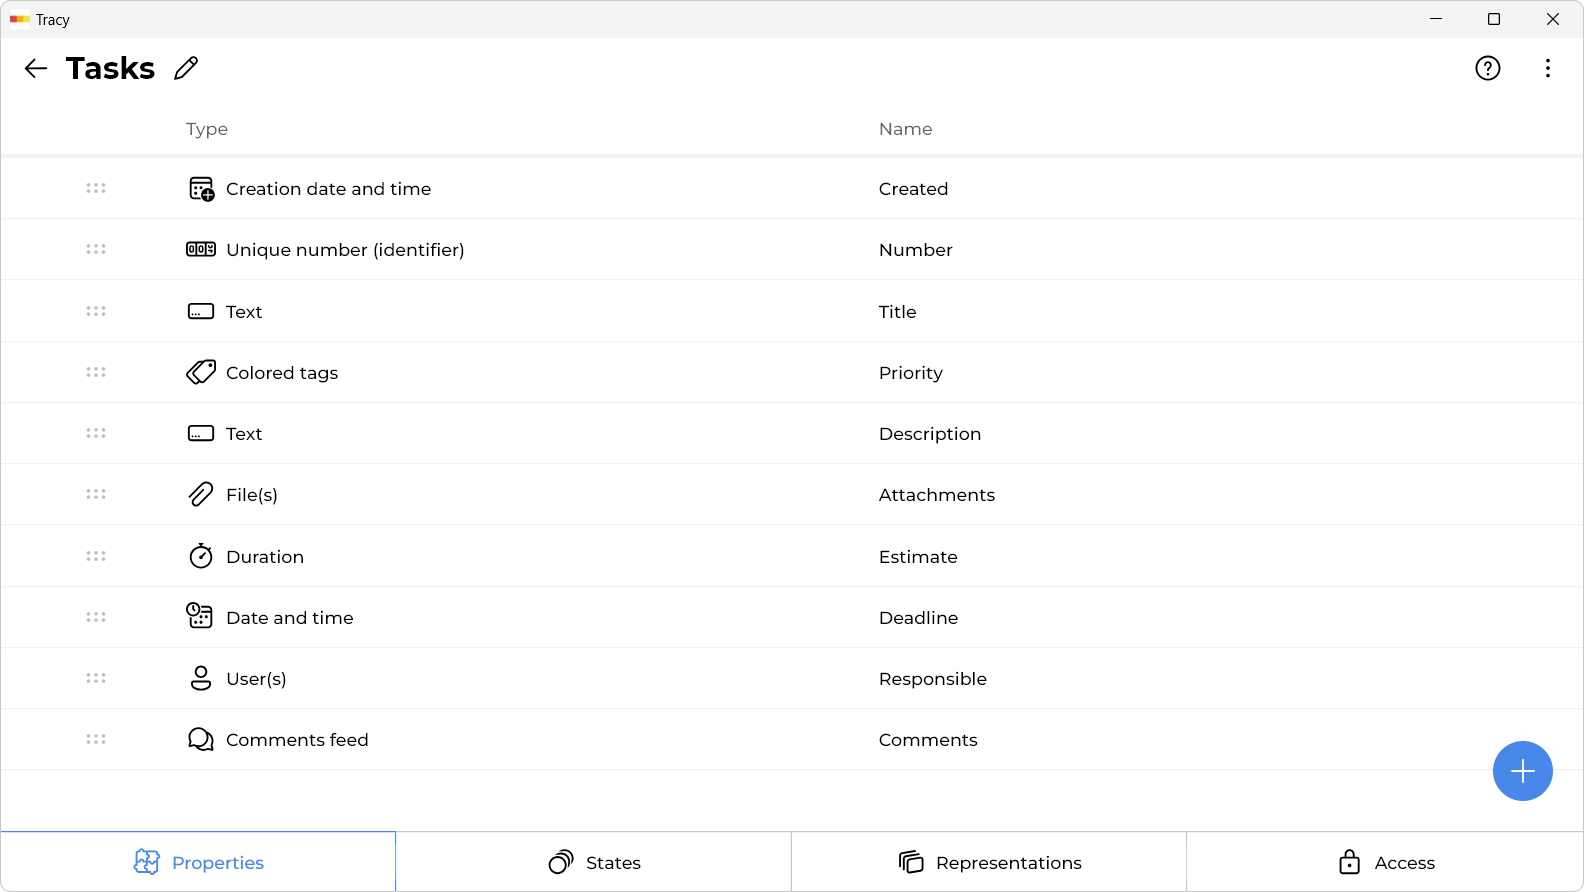
Usually, tasks require certain information. Immediately after registration, you will already have a customized task card (with three test tasks that can be viewed and deleted):
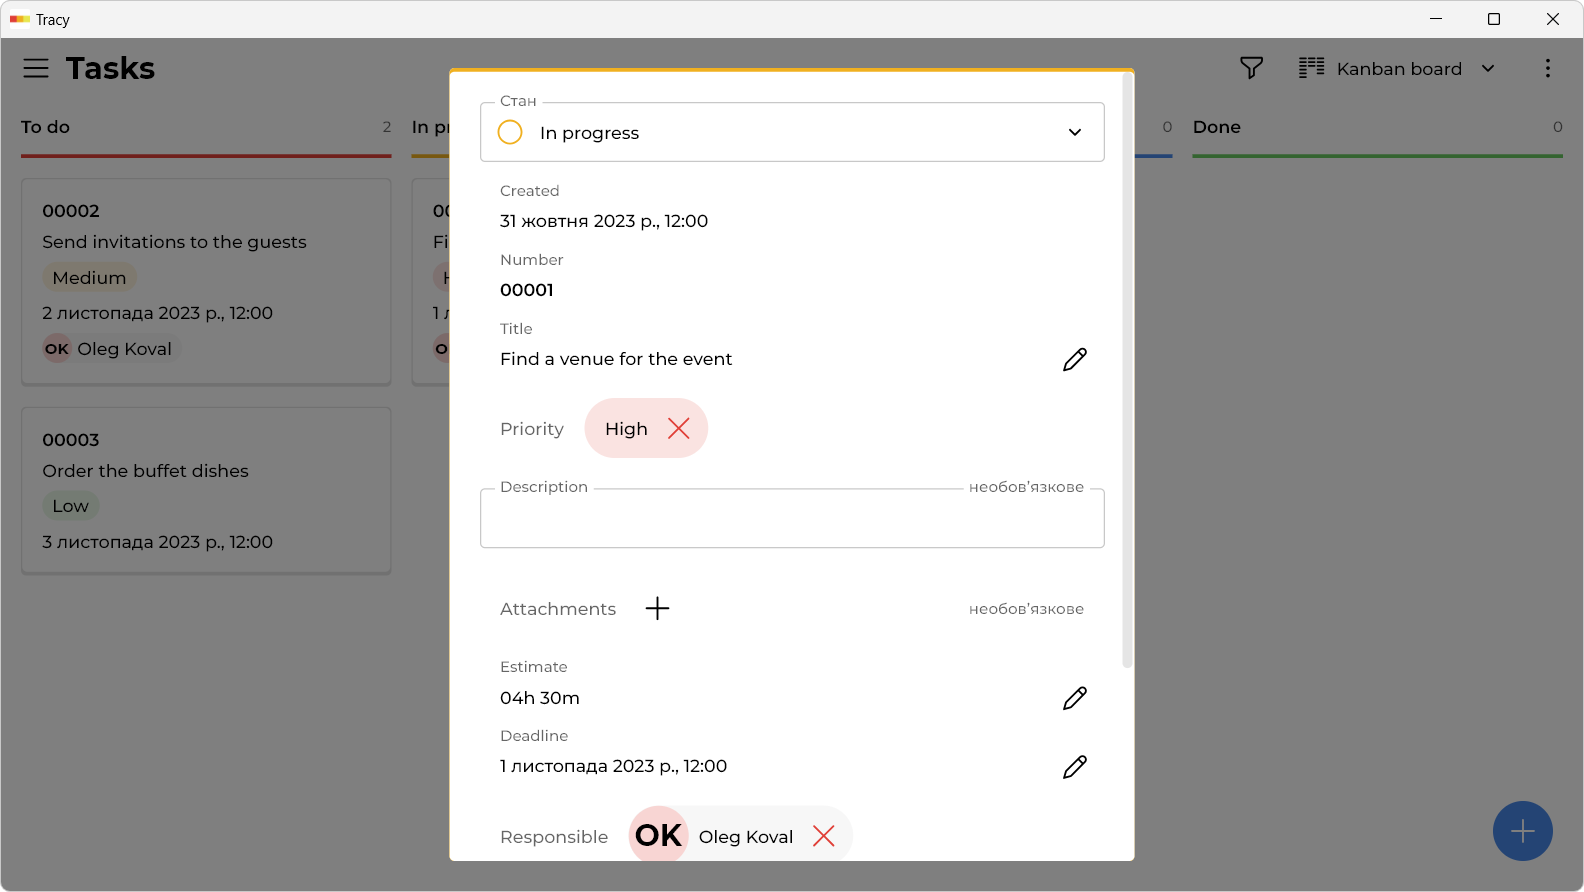
As you can see, you have fields such as date and time of task creation, its number, title, priority, description, attachment (possibility to attach files), estimated completion time (so that you can plan work and use, for example, a Gantt chart), deadline, responsible party and comment feed. This is a very general list that may be suitable in many cases, but the important thing is that you can change these fields yourself: remove unnecessary ones and add new ones. There are over two dozen different types of fields (called properties in Tracy): you can store text, numbers, dates and times, images, files, tags, barcodes, even map locations, and more.
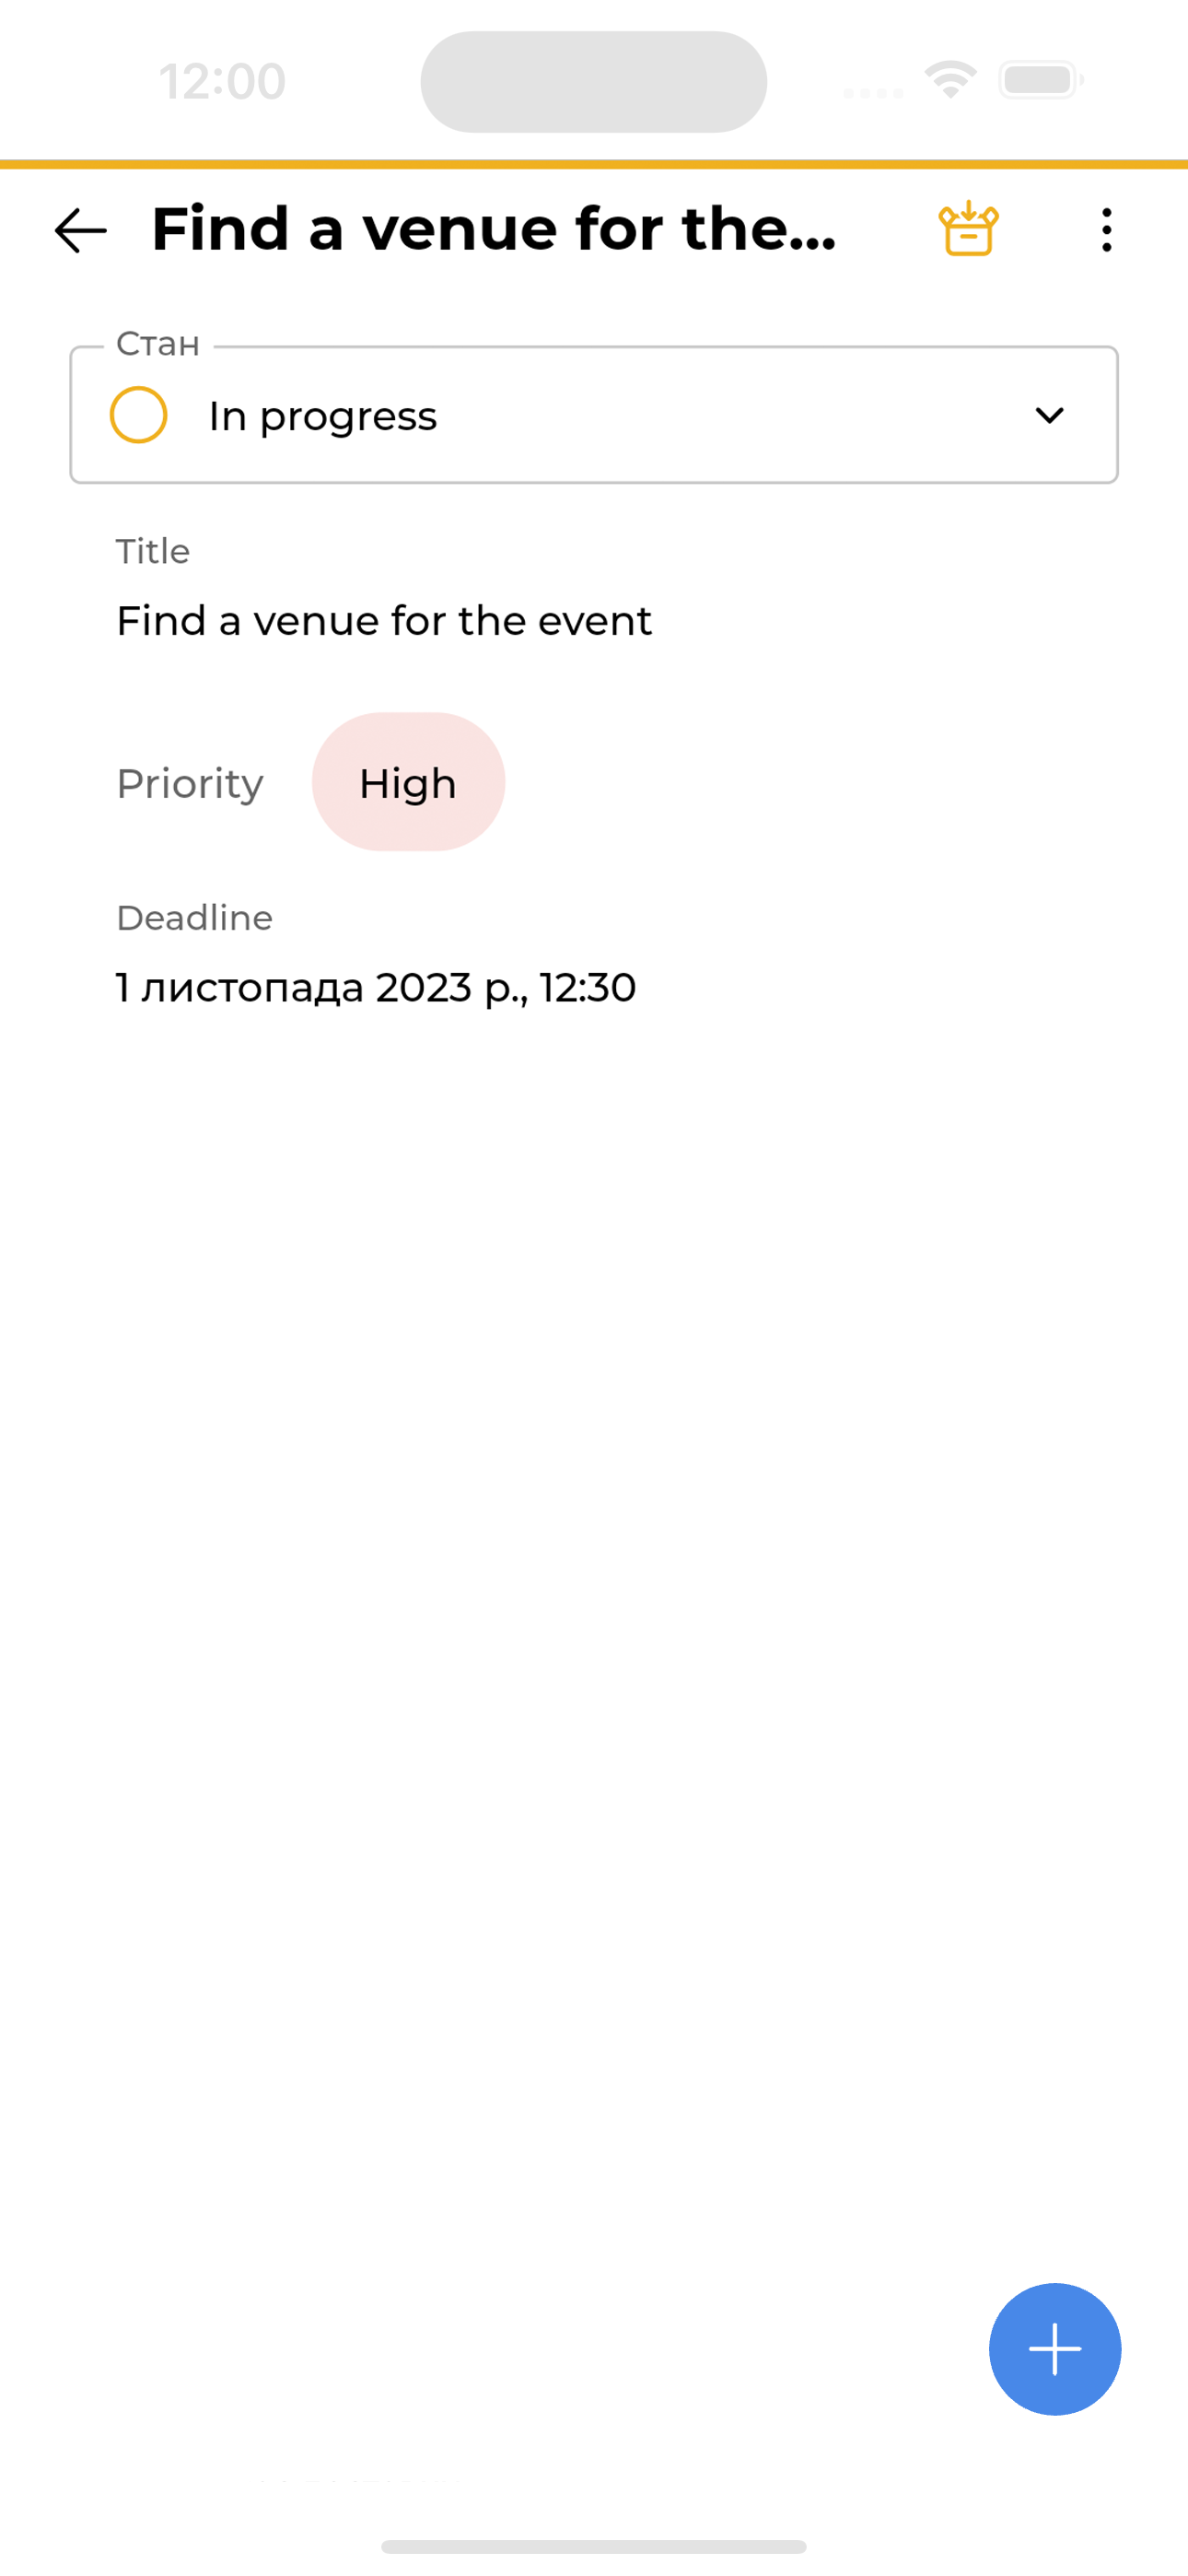
You can also show or allow editing of different information to different people. For example, if a task card contains sensitive information (such as financial information), you can decide that it is not necessary for the performer and they will not see it, and you will not have to store it somewhere else and complicate everything, because it will remain available to you. Here’s what a task for a responsible person might look like:
4. Work With Tasks
Now let’s see how exactly we can work with tasks. The mode switch for working with them is located at the top right:

In Tracy, these modes are called representations. That is, you can interact with the same tasks (or any other data) in different ways: view them as a list, drag them from state to state on the Kanban board, schedule work using the calendar or the Gantt chart. There are more types of representations, you can add the ones you need and fit your data.
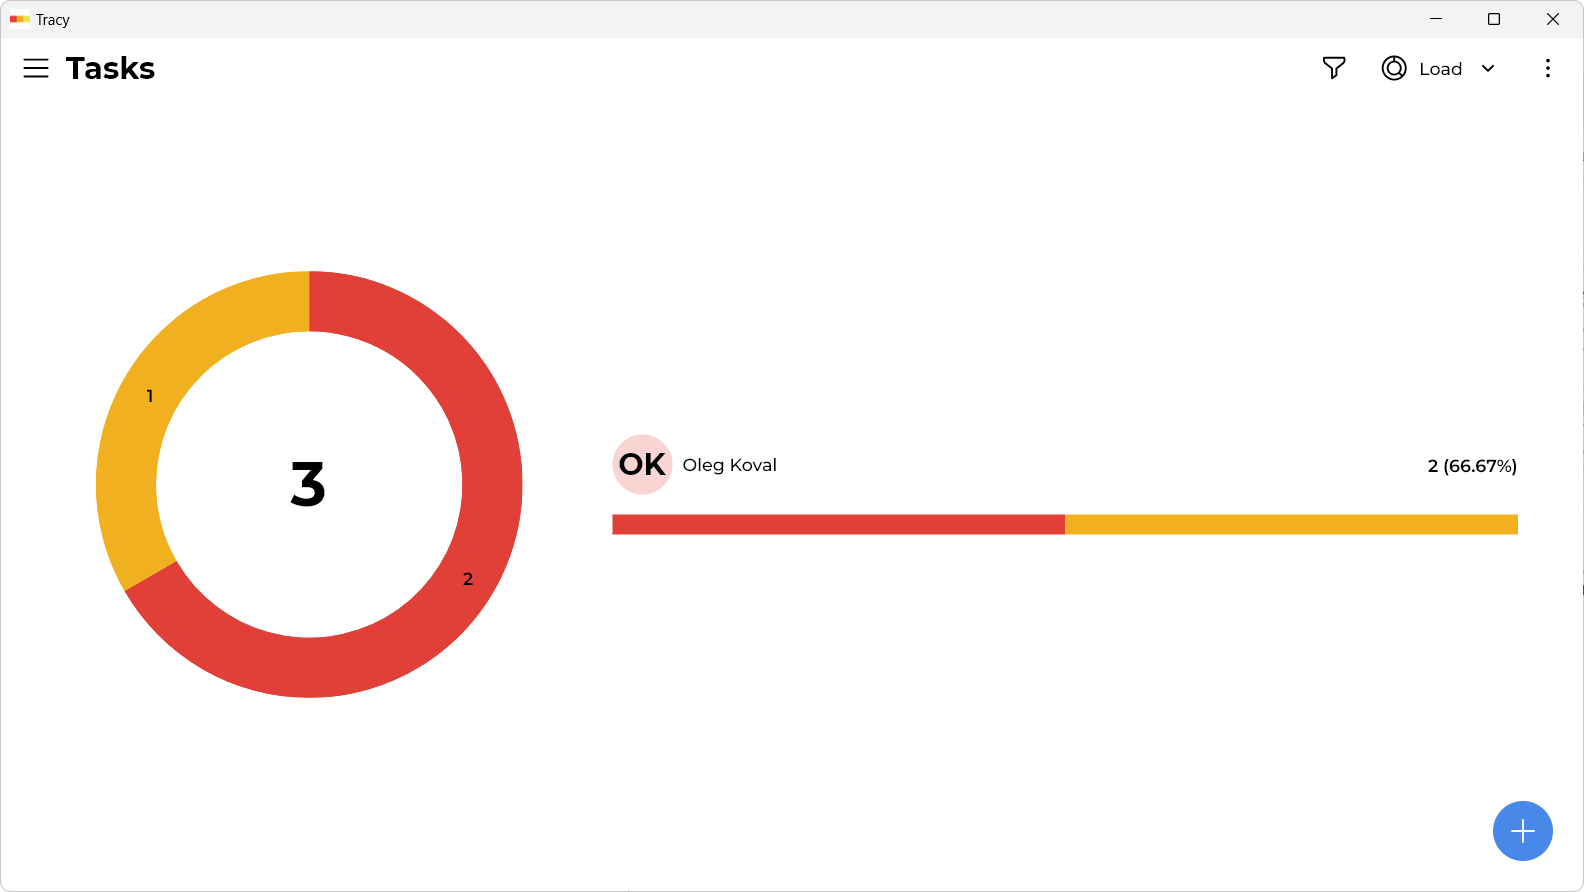
For example, you can add a workload schedule to control the distribution of tasks between the responsible parties:
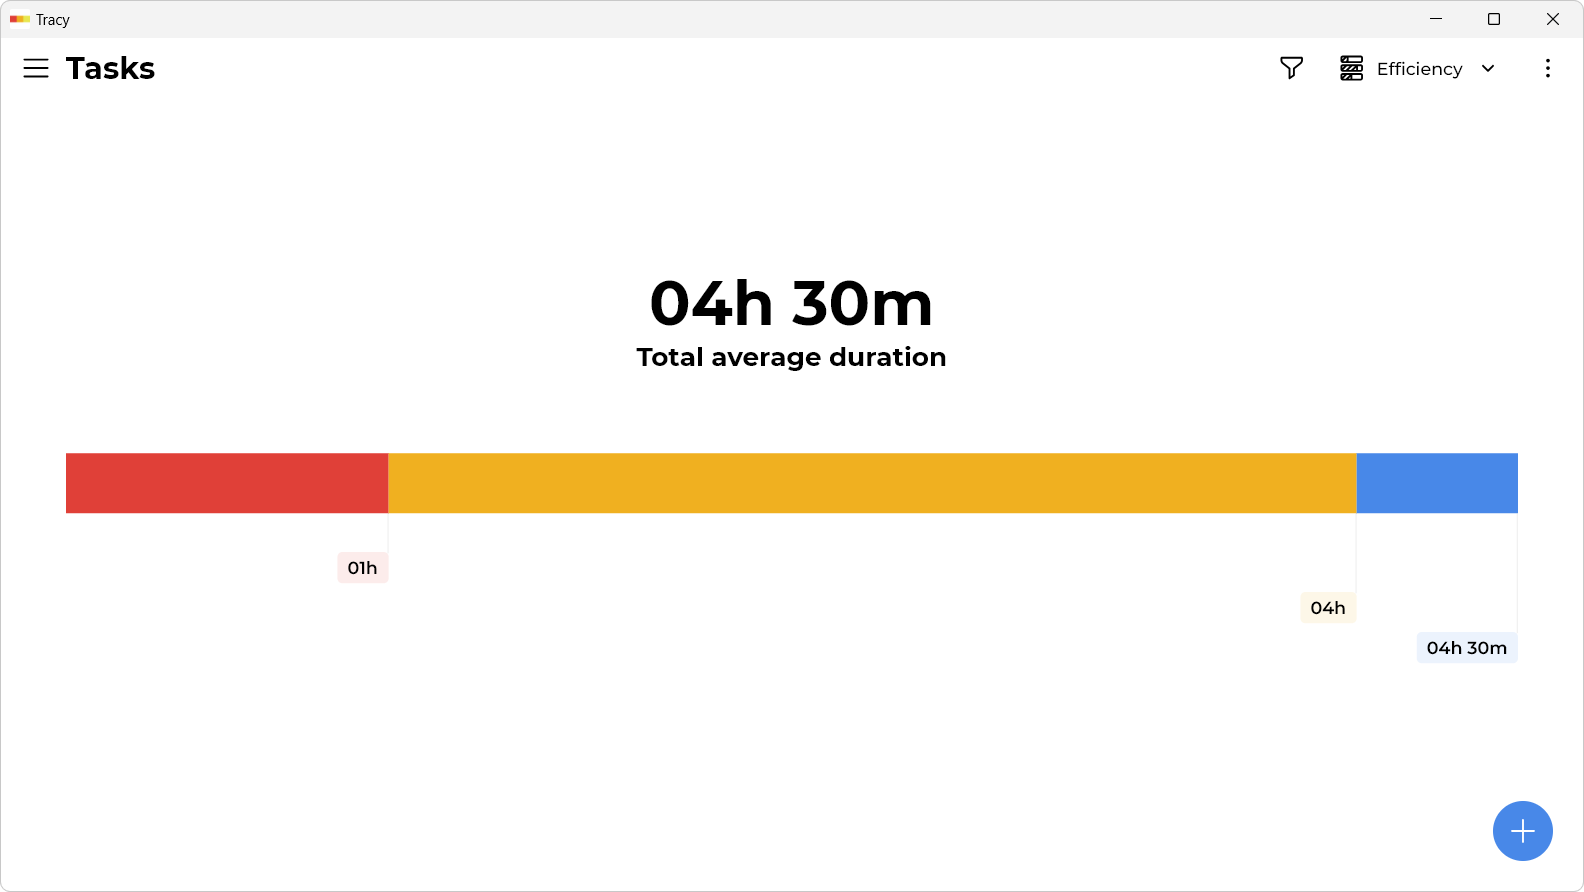
Or compare the average duration of tasks performed by different responsibles:
5. Search
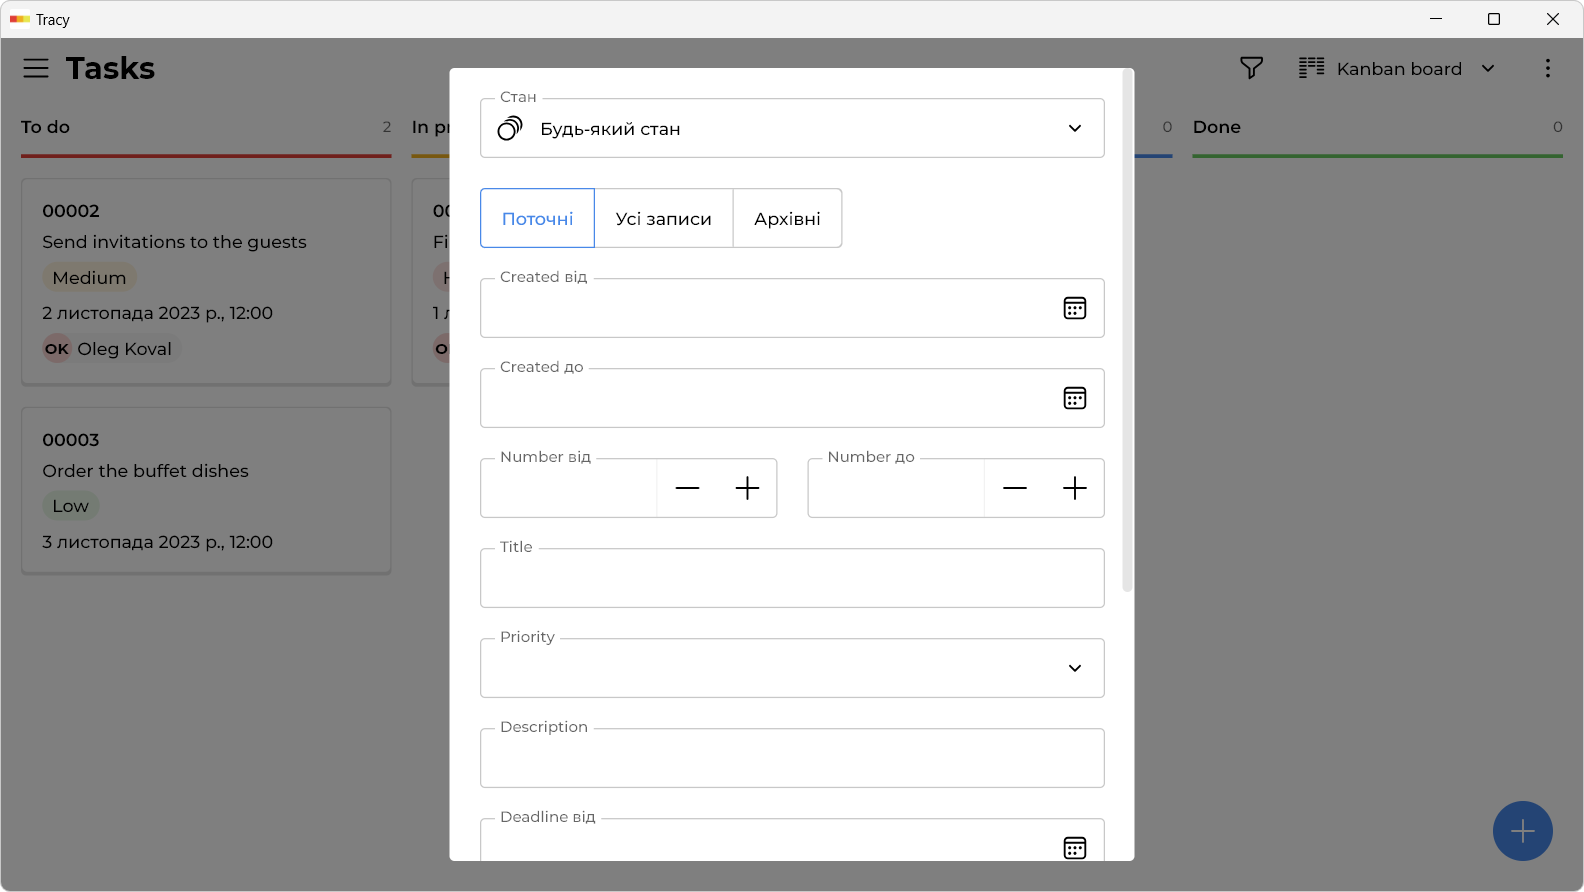
You can conveniently search for tasks by the value of any property. This, by the way, is an additional reason why it is worth detailing the fields in the task card as much as possible. So that you can then find, for example, those that were created at the same time in a certain period, had a certain priority, the responsible party, as well as the specified text in the name of the attached file:
6. Activity Log, Trash, and Export
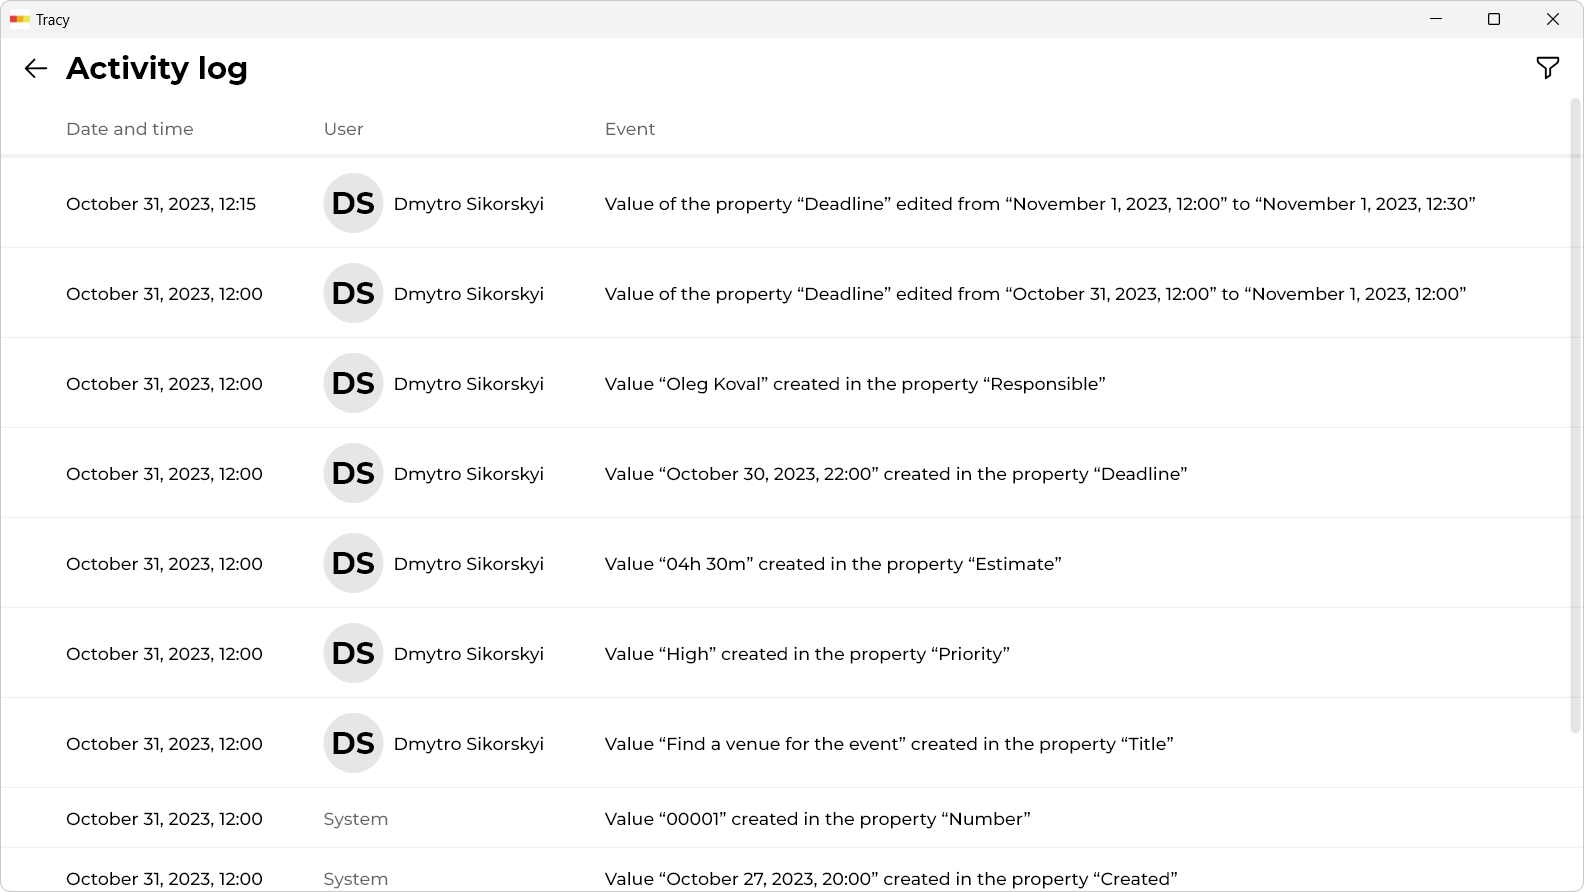
Importantly, the actions of all users are logged, so you can view both the big picture and the history of a specific task. For example, let’s try to change the deadline. This is how it looks in the log:
There is also a trash bin (where deleted tasks end up and from where they can be restored if needed) and export to CSV or Excel.
7. Customization
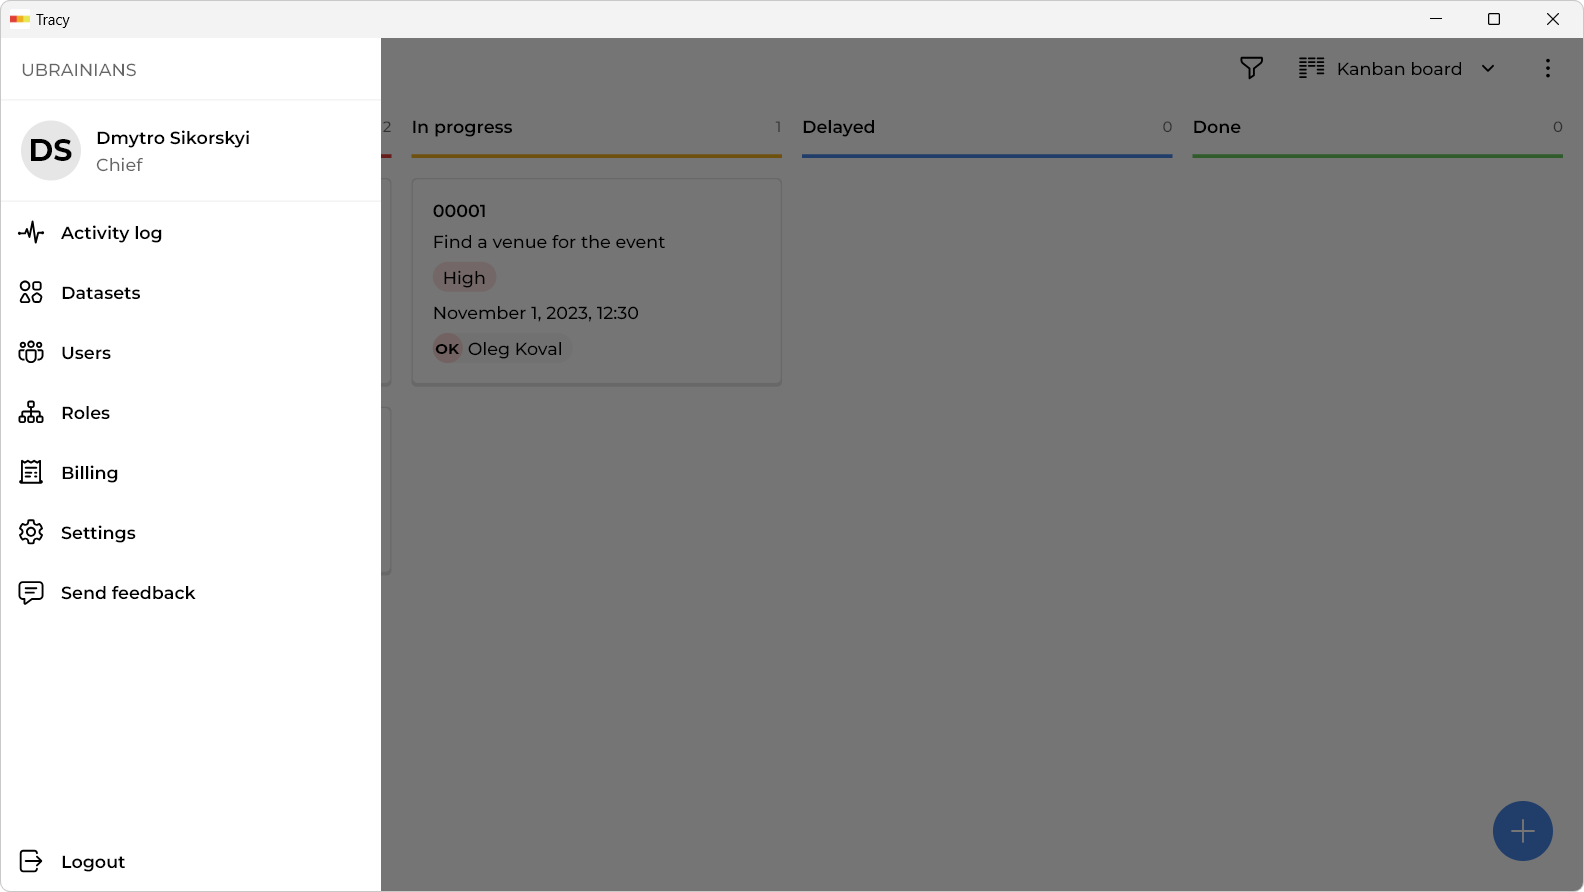
Now let’s see how you can customize Tracy to suit your needs. Open the main menu:
Moving on to datasets:
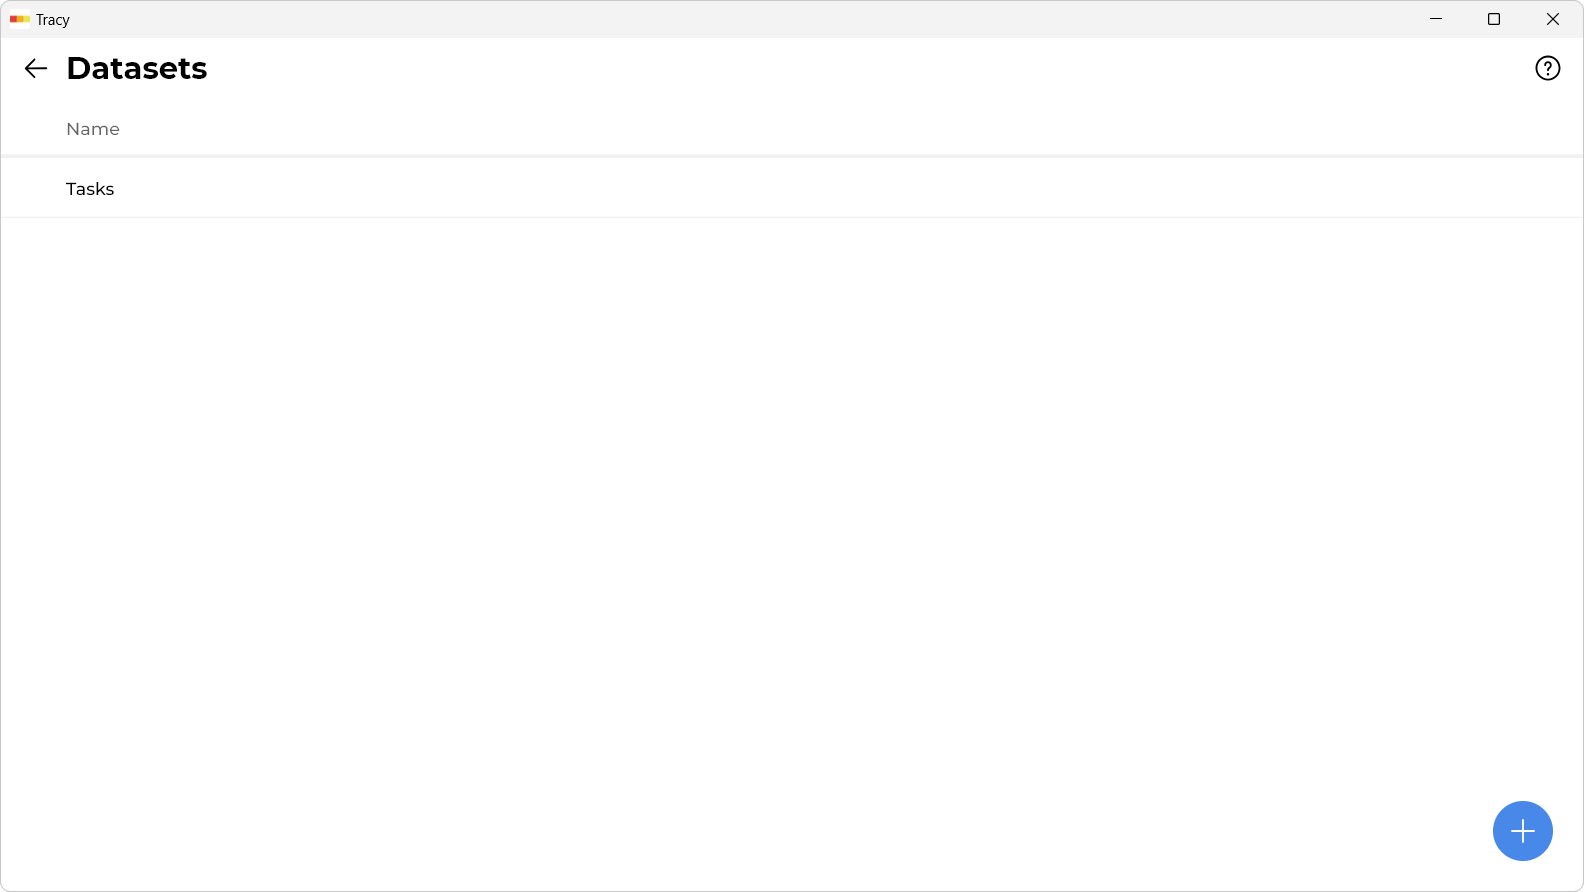
By the way, you can work not only with tasks, but also store other data, which we will cover a little later. Now we only have tasks, so we click on this line. All settings are shown here:
As you can see, there are 4 tabs at the bottom: “Properties”, “States”, “Representations” and “Access”.
Properties
Properties, as we said before, are the details you need to store about each task. Let’s try to add a new property. Press the plus sign:
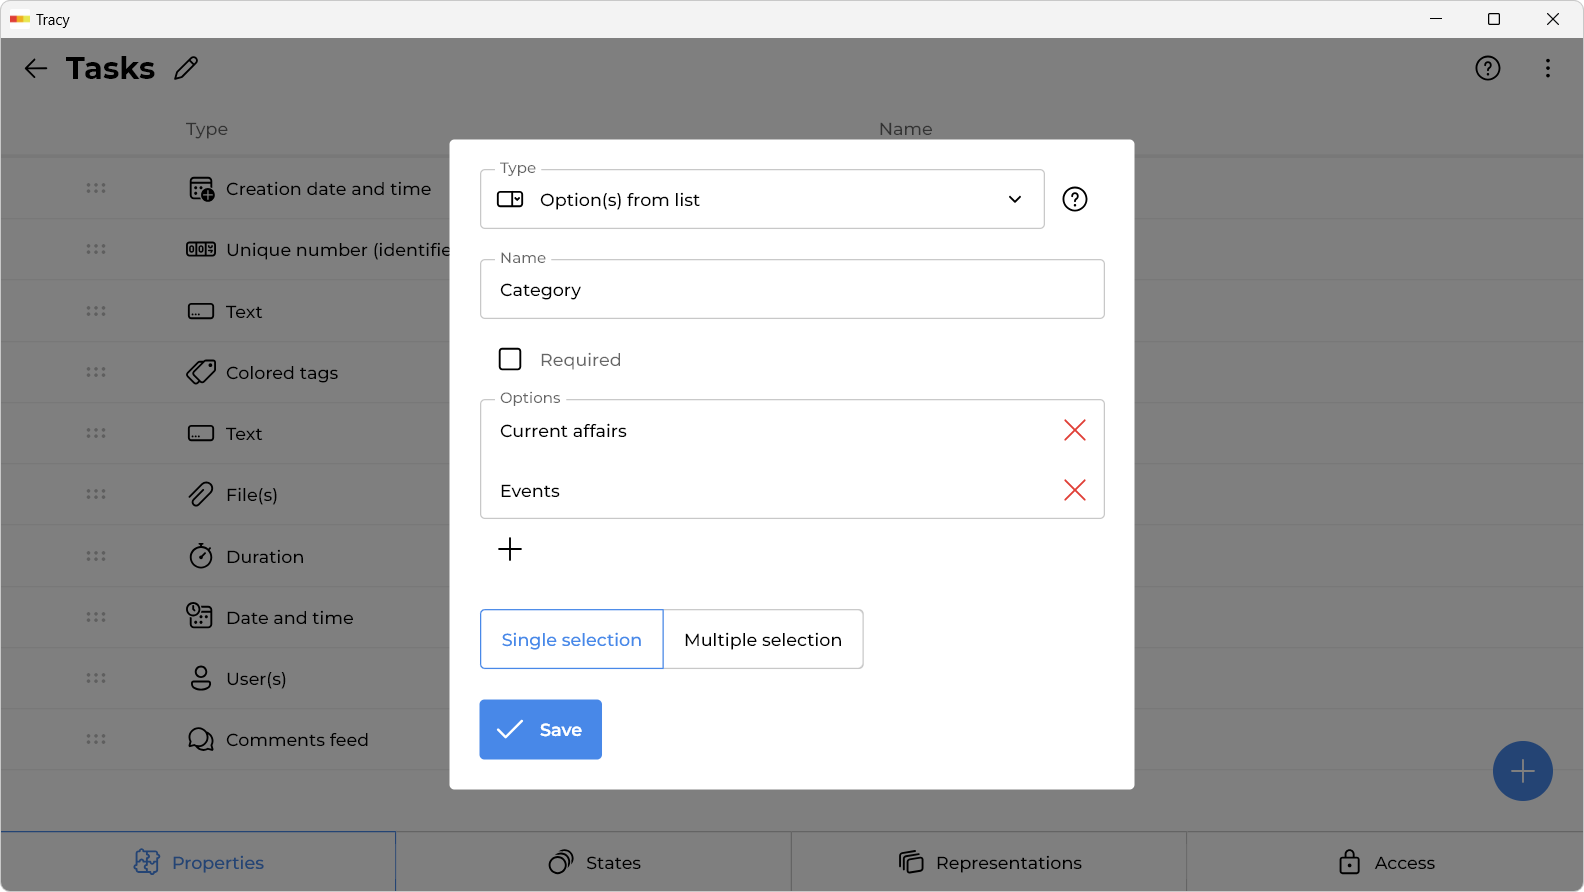
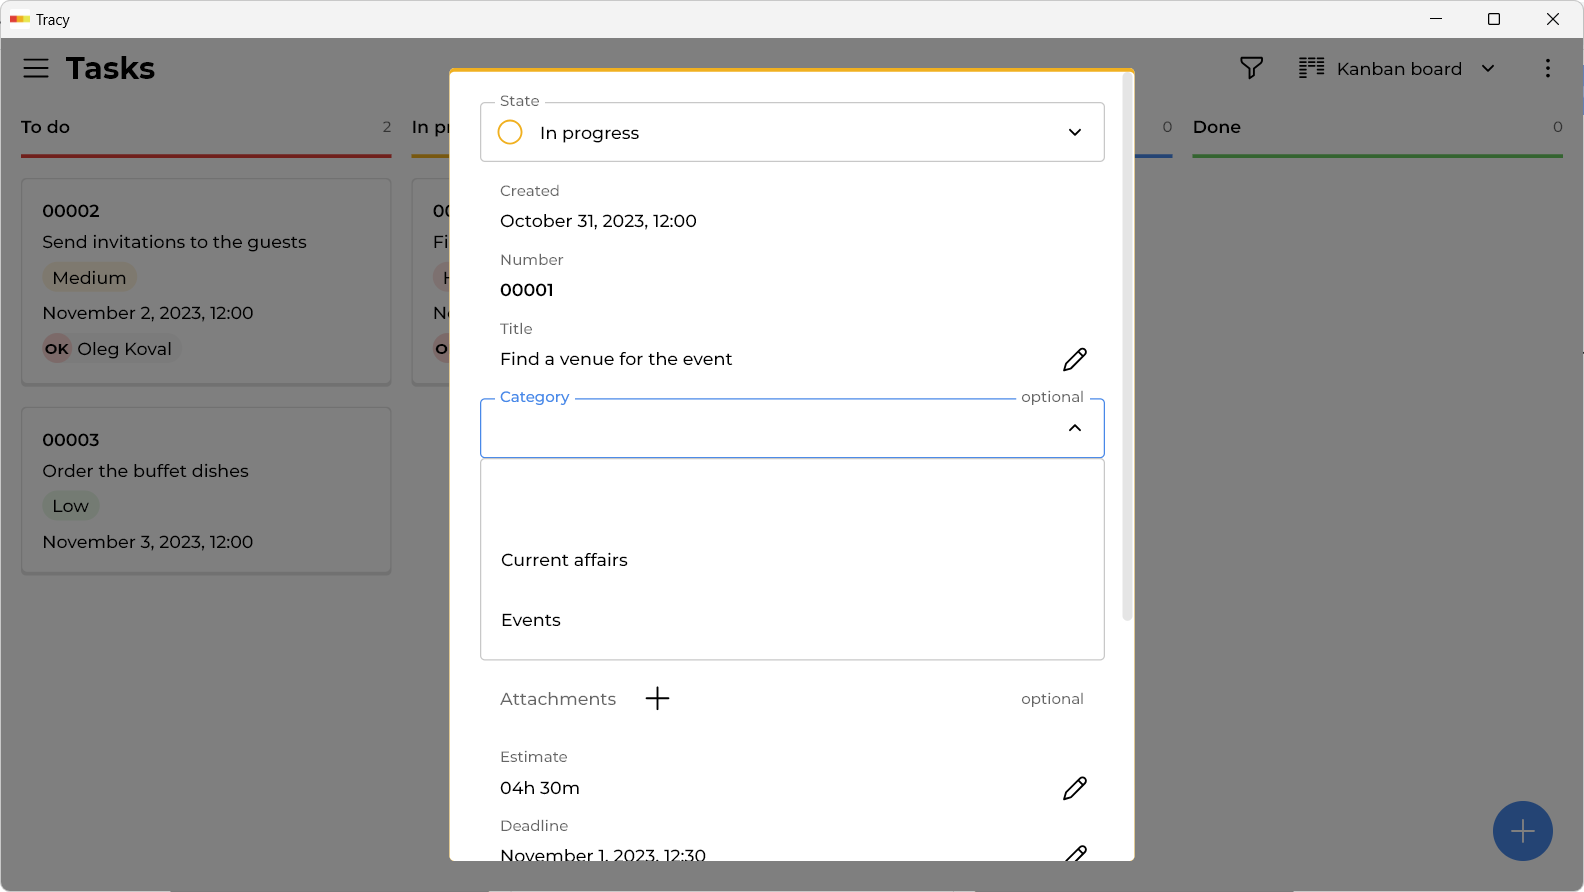
Select the property type, for example, “Option(s) from the list”. Enter a name that is clear to us. For example, “Category”. We added a couple of options (“Current affairs”, and “Events”). By the way, we can change the sequence of properties, and drag this new one higher. That’s it, now we can choose a task category:
By the way, if your organization would hold events on an ongoing basis, it would be more logical to create a separate dataset for events and better detail its properties, for example, to have separate fields for location address, rental cost, etc.
States
Let’s go back to the settings. The next tab is “States”:
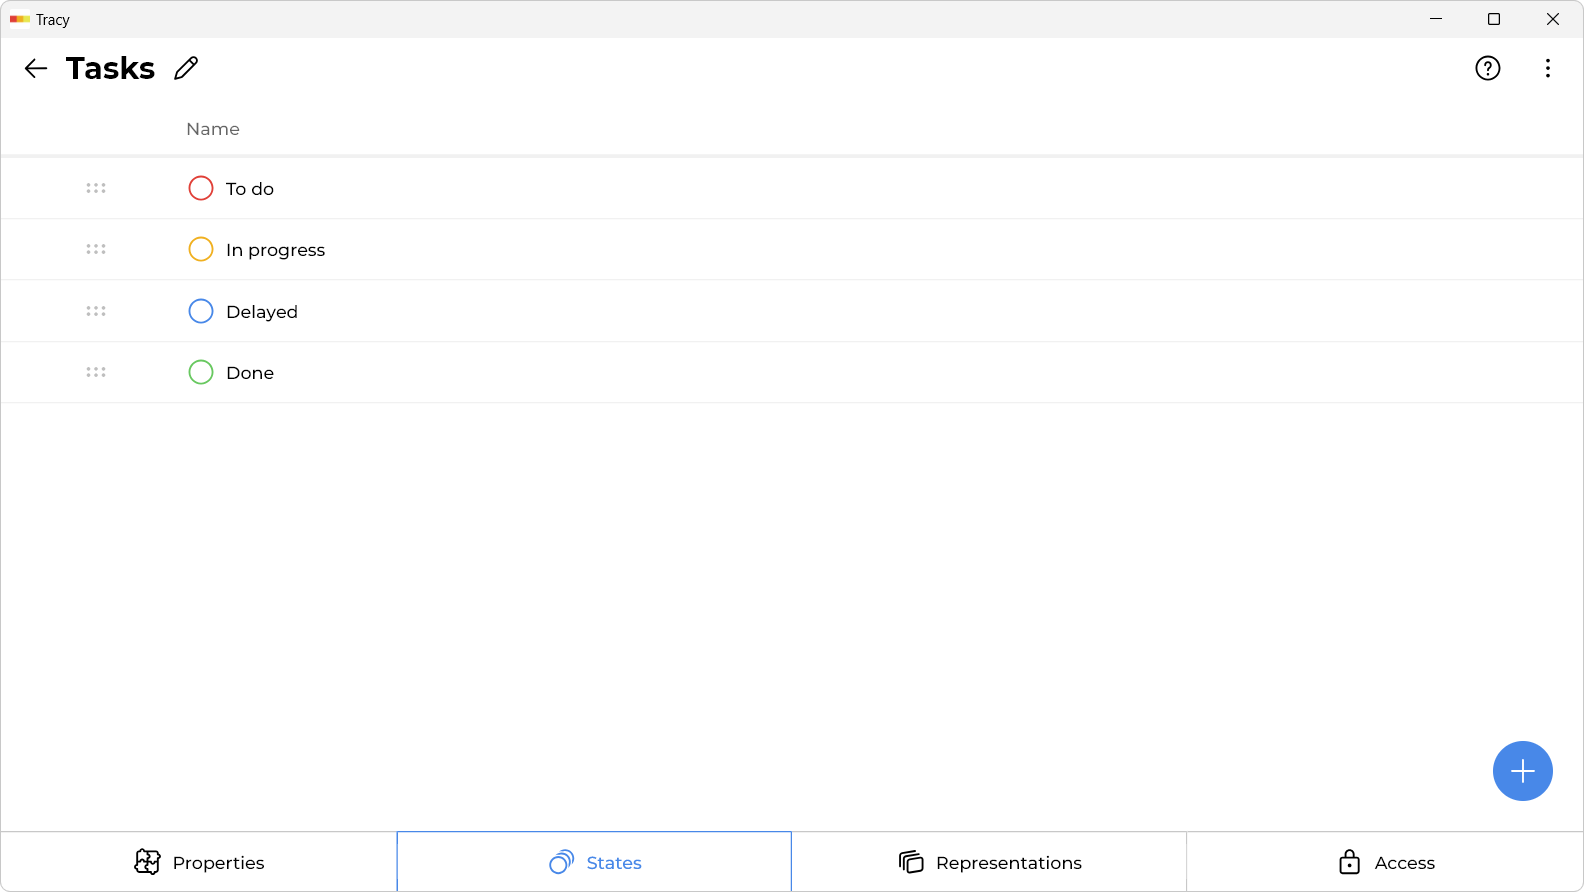
States is a general word, in our case, it rather concerns the stages of task execution. You can add as many as you need.
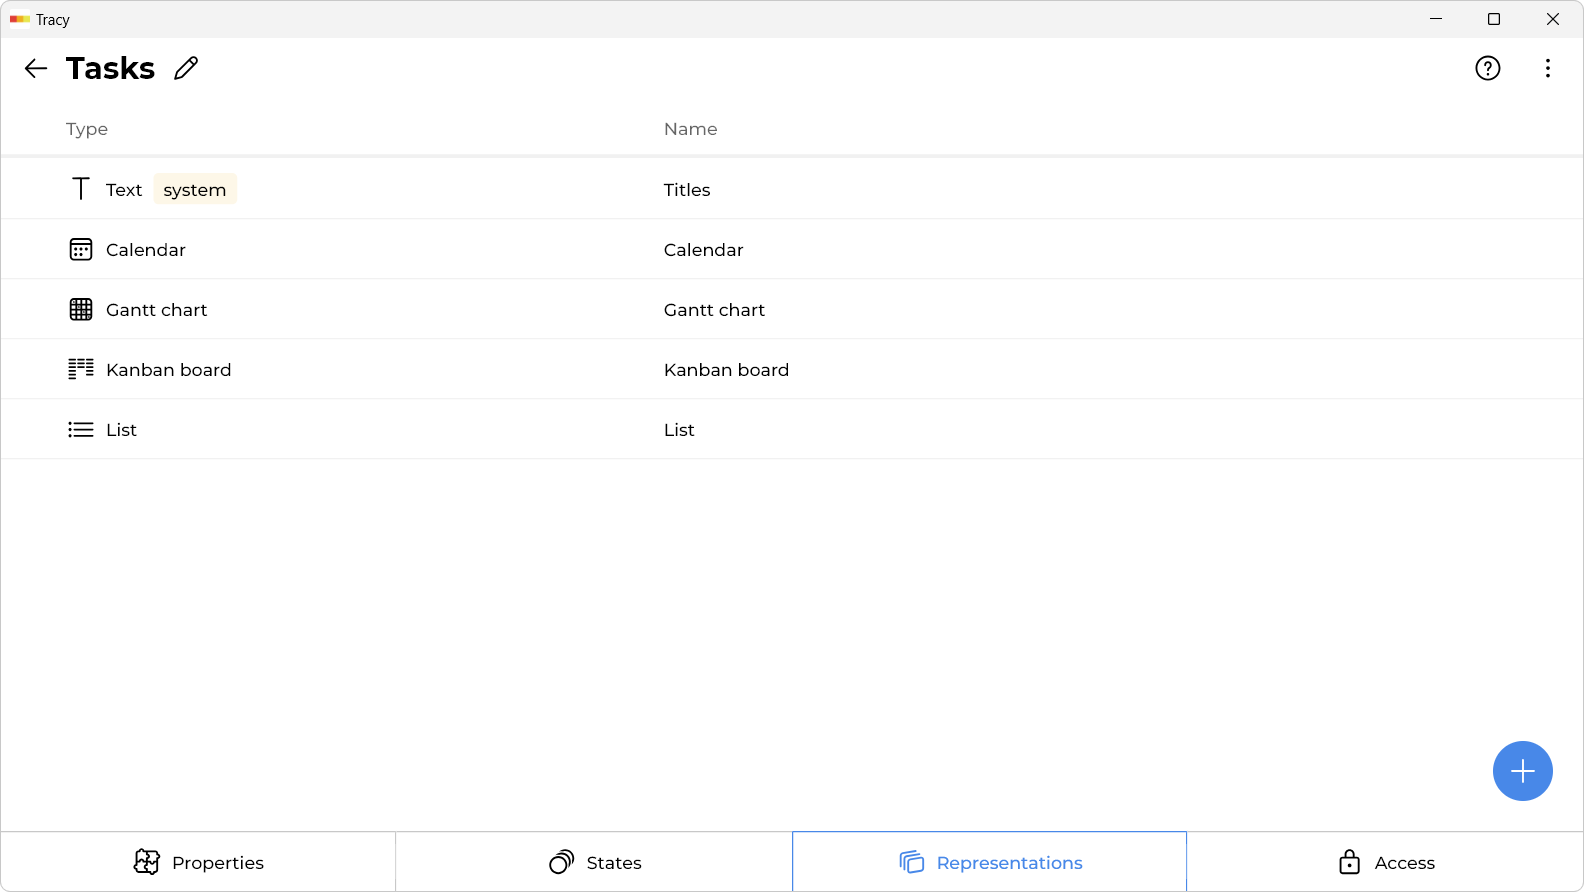
Representations
The “Representations” tab allows you to configure how you will work with tasks and view them:
For example, let’s see how you can build a graph of the workload of those in charge. Press the plus sign to create a new representation:
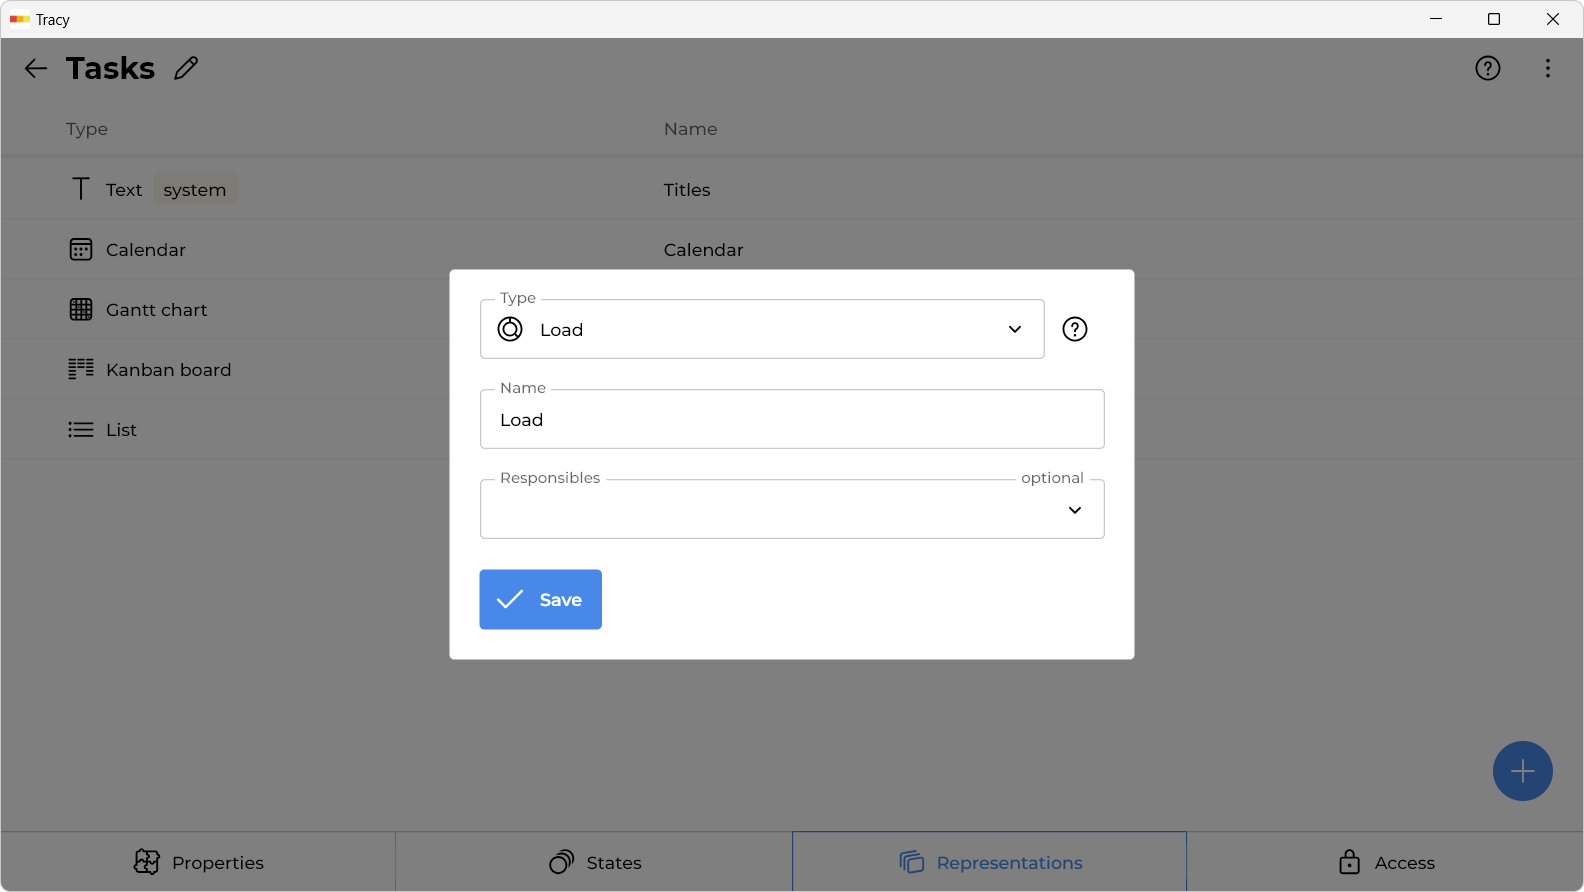
Select the “Load” type, and enter any convenient name for you. In the “Responsible” field, you can select “Responsible”, but this is not required, because we do not yet have assigned users of other roles. That’s all, now we can see exactly how the tasks are distributed by state and responsible:
By the way, the data is updated in real-time, so if someone adds a new task, or changes something in an existing one, it will immediately be reflected in everyone who has Tracy open.
Access
We return to the settings again, now to the “Access” tab. Here you can specify who (by selecting a user role from the top left), when (in what state) and what can be seen or edited, separately for each property:
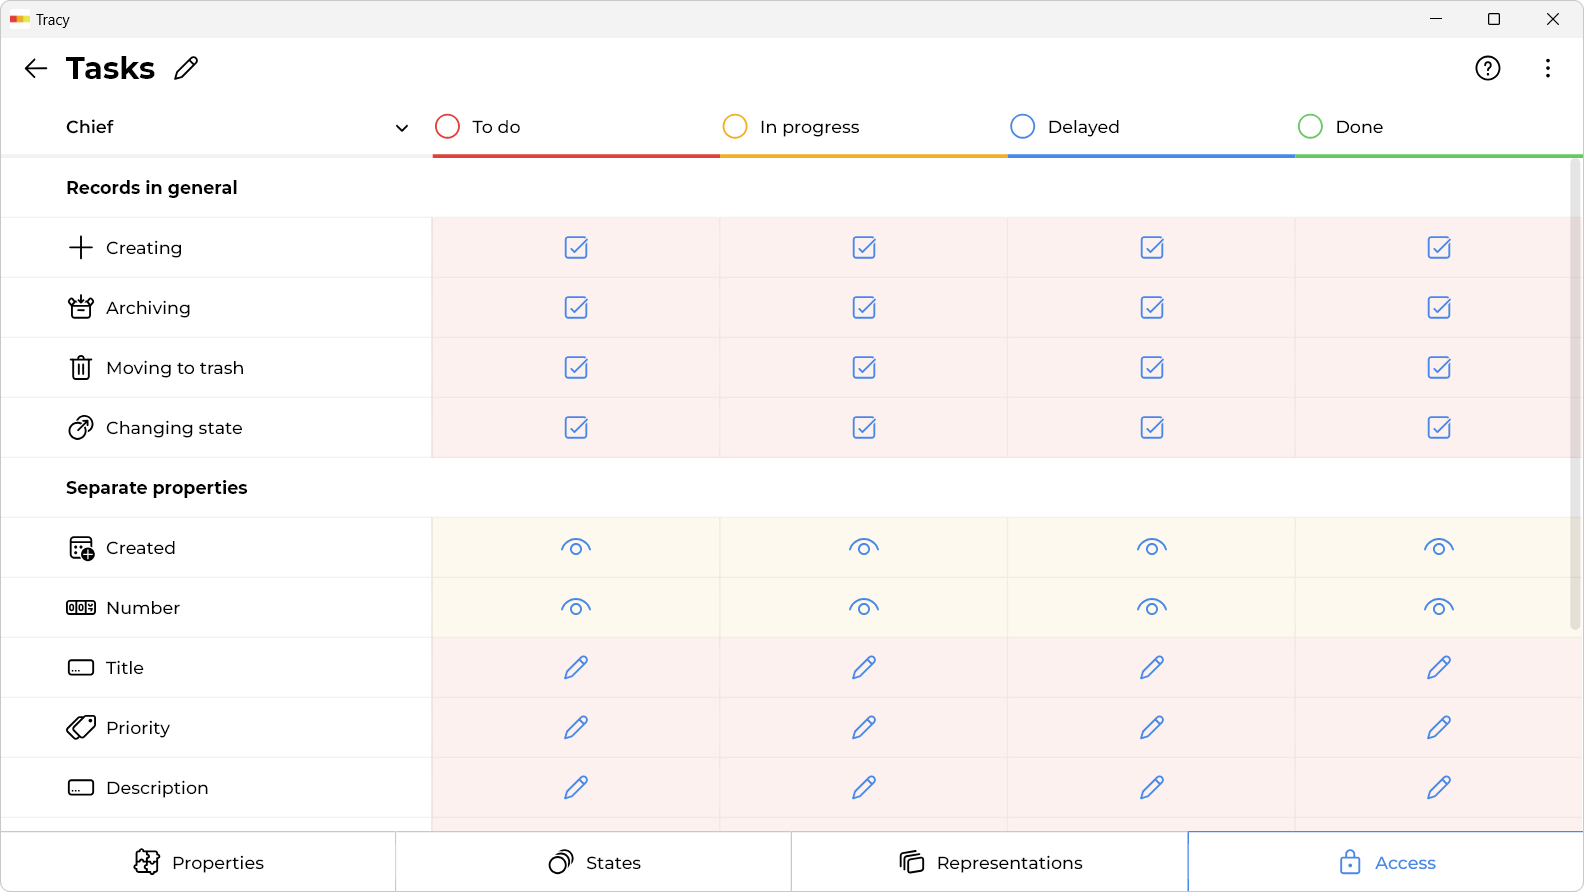
After registration, you have the role “Chief”, so you can edit all data in all states (for your role, there is a pencil everywhere). Upon switching to those in charge we will see that they cannot edit any property of the task. They can only view the properties of the tasks to which they were assigned:
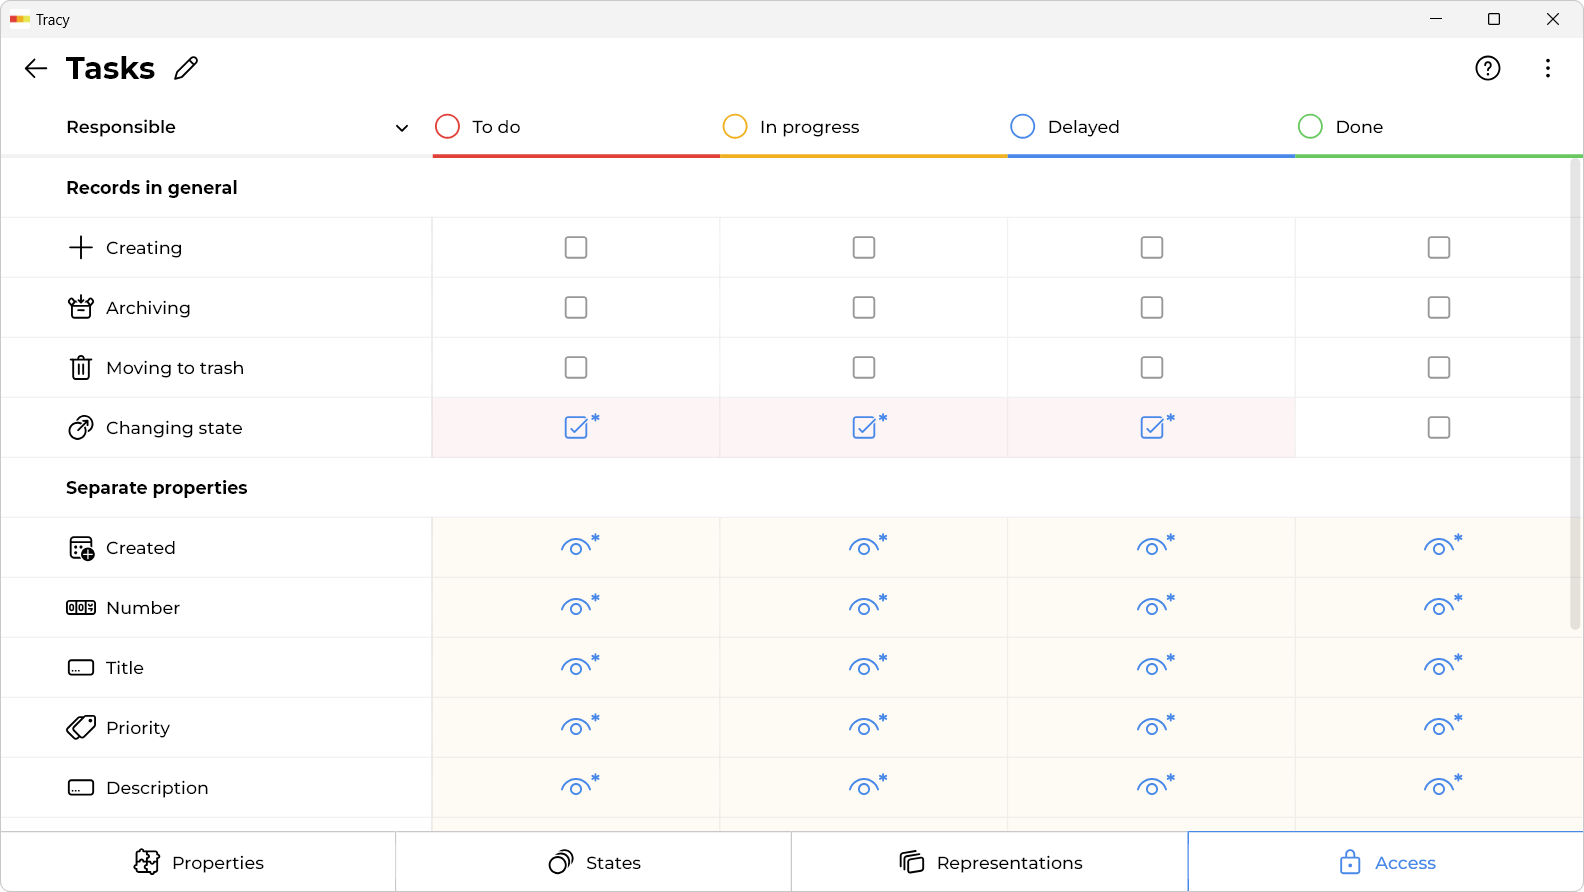
To be clear, the person in charge enters Tracy and sees only those tasks for which you have assigned them, they can change their status upon the completion of the tasks but they cannot change the tasks themselves in any way. At the same time, you can see information about all the tasks and can edit them all. Those responsible are just an example. Instead of responsibles, you can set access for employees of different departments, for example. That is, there can be many roles, and access is configured separately for each of them.
8. Work With Other Workflows
Of course, you can use Tracy for more than just managing tasks. You can add other datasets (for example, “Customers”, “Orders”, “Requests”, etc.), with other properties, add roles and users. You can even combine data with each other, for example, attach customers to orders.
Please write to us if you have any questions. We will be happy to help you get a tool for organizing your business.
FAQ
What services exist for task management and project coordination?
Some of the most popular tools include Trello, Asana, Jira, ClickUp, Notion, Tracy, and Monday.com. They allow you to create tasks, assign them to team members, and track progress. Each platform has its own features: some are better for IT teams, others for general project management. Tracy, for example, is designed for teams working with limited resources and needing simple visual control. The best tool depends on your team’s specific needs.
Can Tracy be customized for my team’s specific workflows?
Yes, Tracy has a flexible setup that allows you to tailor it to any workflow. You can create custom task templates, fields, tags, and statuses. This makes it easy to reflect the exact logic your team follows. Whether it’s aid delivery, equipment repair, or social support — Tracy supports individual processes. The setup is quick and doesn’t require technical knowledge.
How can I ensure that a team member only sees the information they need?
In Tracy, you can configure user roles and permission levels. This allows you to restrict access to projects, tasks, or fields as needed. For example, a contractor can see only their own tasks without internal comments or budget details. This keeps sensitive information secure and lets team members stay focused. It also reduces information overload.
What task views are available in Tracy?
Tracy offers multiple visual modes — Kanban board, table view, and calendar. This lets each team choose the format that works best for their workflow. Kanban is great for ongoing tasks, while the calendar is ideal for planning events. All views are synchronized, so any update is reflected everywhere. It helps keep work organized and the big picture clear.
Is Tracy suitable for tracking team workload?
Yes, Tracy shows who’s working on what and how many tasks each person has. This makes it easier to distribute work evenly across the team. Visual dashboards display project progress and each member’s workload. It helps avoid burnout and allows quick reaction to bottlenecks. All insights are centralized and easy to access.
How quickly can I start using Tracy?
Signing up takes just a few minutes, and you can start creating tasks and projects right away. The interface is intuitive and doesn’t require much learning. There are tips and examples to guide new users. Even basic digital skills are enough to begin organizing your team’s work. This makes it ideal for both grassroots groups and experienced managers.
Can I attach files to tasks in Tracy?
Yes, you can attach documents, images, or spreadsheets directly to any task in Tracy. This is helpful for storing reports, instructions, or supporting materials. All files stay linked to the relevant task, making them easy to find and access. This keeps the context clear for everyone. It also reduces the need for external storage or sharing via messengers.
How does Tracy simplify team performance analysis?
Tracy automatically records all actions and changes made in projects. This lets you see who did what, how long it took, and where delays occurred. Visual dashboards with filters and stats are available for quick overviews. It helps you make data-driven decisions instead of guessing. As a result, your team works more efficiently and reporting to partners or donors becomes much easier.
 Dmytro Sikorskyi